A Quick One Because I’m FUMING

the-birth-of-venus
Although looking at this is making me feel slightly better

No time for a long tutorial this week. I went out drinking 3 nights in a row and they were all excellent fun, but then Monday morning came and the pain-pleasure balance kicked in. Consequently I’ve been having what shall henceforth be known as The Week of Fail. Basically I forgot how to computer, and since computer-ing is my entire job description things have mostly sucked your ma’s left one.

Botticelli’s ‘Birth of Venus’ is not at the top of the post simply to soothe me, although it does. It’s there to illustrate what I’m currently working on. My long-term project is a replacement for the hideous Beatles tribute which once hung in the bathroom of my flat. The medium? Cross-stitch. Obviously. I’ve been at it with my little pattern-generator again, and here’s what it came up with:

the-birth-of-venus_pattern

Just shy of 40,000 stitches of 15th century Renaissance gorgeousness, made tacky as all hell and hung above a toilet. Because that’s how I roll.*

Slight flaw with this plan: 40,000 is a lot. It’s a big number. As in, I’ve been working (granted, sporadically) for a few months and this is what I have:

IMAG0557

A bit of the sky and a bit of a wing (that brown thing on the left). I’m doing the boring bits first on purpose, clearly. I’m determined it will be finished one day though, so I’m off to work on it a bit more right now whilst watching the Sopranos and drinking tea. I will also be praying to the abyss that this trinity of relaxing pass-times reduces my urge to destroy all life. As should you.


* Get it? Roll? Toilet roll? Sorry, I couldn’t let a post pass without a footnote. They’re kind of my thing now. I feel guilty for making you come all the way down here though, so interesting fact: I don’t roll at all. I’m totally a scruncher. BACK

Shiny Jar-o-Lantern

lantern


I confess, ever since I made all of those Jar-full-o-Yarn centrepieces for my nana’s 80th birthday party I’ve been looking for something to do with the jars that survived my cousins’ rampaging hoard of small children.* I could keep them as they are but I have a very small flat and I have eight jars. We’re at critical mass here. There could be a chintzy meltdown any second. Which, for those uninitiated in ornamental physics, would surely level half of my street. I can’t allow that on my watch, so expect a few jar-themed posts. In summary: it’s not because I love jars, it’s because I have jars, and because I’m a hero.

I can’t explain the thought process that lead to this project. It was one of those moments. Those moments where you have to make something so you can blog about it, and you have to start RIGHT NOW because you work full time and you plan on being very drunk for the next few weekends, and nobody wants to read about your hangover ideas.** In this moment all you have is a jar and a pair of leggings. But suddenly these things stop being completely unrelated objects. Suddenly there is crossover potential. Suddenly a wild idea appears.

I also had these household items lying around:

nail varnish paints

That would be paintbrushes, a shot glass, gloopy old nail varnish, and nail varnish remover.

More niche craft items I used:

clear varnish Silicone Glue

Spray-on clear varnish, and my trusty silicone glue. If you learn nothing else today, learn this: silicone glue is one of the most useful things a crafter can own. There’s no punchline here, because I’m deadly serious.

Essentially what I wanted to achieve was the transfer of the skull pattern from a pair of leggings onto the sides of a jar. This is how I did it:

Firstly stuff a ball of yarn into your legging leg and tie it off with an elastic band.

stump
Don’t be alarmed, it only looks like a stump.***

Next you need to stuff this into the jar, smooth out any wrinkles, and draw over the lines of your pattern with the silicone glue. Once this is done, take your leggings out and leave your jar to dry over night.

skull drawing silicone-d jar

Now get out your old nail varnish, and pour a few drops of nail varnish remover in. Put the lid back on and shake it up. Check the consistency and add more remover if necessary. Go easy. You’re thinning out the varnish to make a paint, basically. If you go too far there’s no going back, and runny paint is no use. It won’t stay within your silicone lines. Keep going until the varnish pours easily out of your bottle and into your shot glass, but still has a consistency which won’t drip.

nail varnish paint

Once you think you’ve got a viscosity level you can work with, start applying paint to your jar.

IMAG0375 IMAG0377
Painted lantern dry

It may take several coats to be finished. I did two, with a third pass to touch up areas that didn’t look even.

Let it dry completely, and then you’re free to start peeling. I liked using the points of scissors to remove my glue. It’s hard to describe the technique, so as a special treat I made a video for you. Yes, people, moving pictures:


Thrilling stuff. That beeping sound at the end was my oven, by the way. I get hungry when I’m crafting, or working, or sleeping, maybe dead.****

The peeling takes a while, but it’s actually really satisfying if you’re the kind of person who prefers to pick their nail-varnish rather than remove it cleanly with chemicals. So, the kind of grungy ol’ goth who’d be reading about how to make a skull lantern using leggings and nail varnish in the first place. If you’ve gotten this far you’re probably my sort of people. It’s ok. We understand each other.

Once you’ve removed as much of the glue as possible, you need to go to a well-ventilated area and spray your clear varnish all over the jar. This is very necessary, nail varnish is too fragile on its own. It will flake and you will be sad.

drying varnish Forlorn Luther

If you’re a flat-dweller, like me, you may need to use a windowsill. If you’re a cat owner, like me, you may be in trouble because His Imperial Majesty, Emperor Luther, Giver of Nose-Boops can’t sit in his favourite spot while the noxious chemicals dry there. I’m a horrid pet owner, it’s true.

Once it’s dry, and night has fallen, light a tee-light and bung it in. Leave the lid off because fire needs oxygen. Remember your GCSE science, it stands between you and darkness in this instance. If that’s too complicated you could use fairy lights with a battery pack.

Jar o Lantern


* There are four of them, but they move around a lot. BACK

** A typical hangover brainstorm:

  • I could write a scathing review of that pattern I once knitted that was unclear about the decorative border on the neckline?
  • Hmmm, maybe I could just write about my thoughts?
  • Maybe I’ll do a video of me talking about my thoughts?
  • Maybe I’ll talk about my thoughts about that pattern that one time, on video?
  • My nose looks huge and my voice is actually making me retch, scratch all of the above.
  • Bookmarks made of felted cat hair. BACK


*** I wonder now if this will be the photo that WordPress chooses to use as a thumbnail for this post when it auto-publishes to Facebook and Tumblr. I wonder furthermore whether I’ll get more hits if my friends think this post involves amputation. It doesn’t, you guys! Go back to watching World’s Fattest Third-Cousin, or whatever. You reprobates. BACK

**** I sometimes fear that there is an afterlife and I’ll spend eternity craving sweet and sour chicken while the means to ingest said meal rots around me. Cremation, please! BACK

De Gustibus Non Est Disputandum

De Gustibus Non Est Disputandum

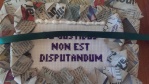
Personal tastes are not for disputing, is what that bit of Latin means. Unfortunately it’s not an ancient Roman saying, the French came up with it a couple of hundred years ago, although I really wish it was. Imagine thousands of years ago the people who conquered most of Europe having a saying that means “It takes all sorts”, or “Each to their own” – whichever translation floats your boat. So once they’d finished subjugating a populace using their renowned stabbing-and-maiming skills they’d let their newly acquired serfs carry on about their business, worshiping whatever bat-shit crazy thing it was that they’d been mooning over pre-serfdom. Actually they really did mostly do that. Which was kind of groovy of them. Kind of. No?

Anyway, I find it absurdly amusing we have a slew of sayings that mean: “Don’t give people shit for liking things that you don’t, because it’s rude and also pointless”,* and yet no one is listening to any of them. The end result is that we mostly stick with people who like the same things, just to avoid the pointless arguments. And that’s a shame, I think.

Does no one else find it bizarre that our social groups are often dictated by our music tastes? We don’t really know why we like the music that we like, but we know that we mostly like other people who like the same things for reasons that they also don’t understand. Doesn’t that feel a bit arbitrary? I mean, I like olives. I don’t know why, they just taste good to me. Should I filter out potential friends based on their feelings about these bubbles of salty deliciousness?**

I’m too neurotic for this minefield. I’m at the point where I no longer tell people what I like in case I have to engage in a fruitless argument about why I shouldn’t like that thing, or worse: see that look in someone’s eyes as they regretfully must consign me to the “not one of us” section of their brain. That look cuts deep, man.

Clearly I have strong feelings about this. Strong enough that I wanted this saying on my wall, and now I have it there, framed in a crunchy halo of free newspaper – the ultimate purveyor of opinion-dressed-as-fact.***

Anyway, let’s not stare too deeply into that pseudo-intellectual-conceptual-art-bollocks-rabbit-hole, here’s a tutorial!

Silicone Glue De Gustibus Stuff

You need this stuff. More specifically: a bit of Aida big enough for your text (count the stitches), some fabric glue, newspaper squares of two different sizes, a tapestry needle threaded with embroidery silk of your chosen colour, a canvas, and some silicone glue. And also ribbon. Ribbon was a last minute decision so there is no picture. If you don’t know what ribbon looks like – tough tits, and also yes you do, stop lying. LIAR.

I was planning on going into exact detail about how to cut your newspaper squares, but then I realised that that’s really dull and that I should let you figure out some things on your own. We’re all adults here.**** I will only tell you that you need two sizes and they need to be squares. None of the lesser quadrilaterals will do.

The frame is made up of two layers of newspaper petals. Large ones go on the outside, smaller ones within. Here’s how to fold them (click to en-big-ulate):

petal_folding
Go easy on me, it’s my first job as a hand model

Use the silicone glue to keep them folded, then trap them under books or something overnight, or until you’re really sure they’re dry (I recommend books and overnight but, like I said, adults).

In the meantime, figure out what you want your cross stitch to say and plan your lettering out. I used graph paper, like so:

De Gustibus Pattern

I don’t recommend that you get it wrong as many times as I did, but if you get it right first time I shall gift you a shiny cookie. Because counting is hard.

Once you have a pattern, cut your Aida to size, and line it up very carefully against your canvas so that your message or image will sit where you want it. It sounds easy but it’s actually worth taking some time over and doing some more counting. Check your work!

Once you’re all lined up start stitching.

Slashes

Luther Helps
This is Luther. He likes to help, especially when there’s string involved.

Once you’ve stitched your message and your petals are dry, pick up the silicone glue again and start assembling.

De Gustibus Assembly 1 De Gustibus Assembly 2 De Gustibus Assembly 3

Again, I recommend you leave this in a safe, cat-free place to dry for a few hours. Then you can take out the fabric glue and add your ribbon. Don’t worry about making a bit of a mess, it should dry clear. Unless you bought the wrong glue. On your own head be it.

De Gustibus Ribbon 1 De Gustibus Ribbon 2 De Gustibus Ribbon 4

De Gustibus Ribbon 3
Let each length dry before folding your corners, things get slippy otherwise

Once your ribbon is stuck down all the way around, wait for it dry. There’s a lot of waiting around in this tutorial. I’m sorry about that. I’d come round and make you a cuppa and kill some time with you but that’d raise all kinds of awkward questions.

Anyway, all that’s left to do is tie a bow where the ribbon ends meet, and hang your new motto on your wall for all to be puzzled by.

If you want to try this, but are behind the curve on chosing a personal motto (for shame!), and you also think it’s best to say it with dead languages, there are some good ones here.

Next week: Skulls, tee lights and nail varnish fumes! Goth times!

* Hey look, I just invented another one! Catchy. BACK

** Serious question. I’m inundated with applicants to be my 335th Facebook friend and I can’t decide between the following:

  • Two pleasant-looking people who I have nevertheless never met and whose motivations are consequently suspect
  • An account for a band that I have never heard, and
  • A guy who inbox-ed me to say “Hey xx” last July, and, when he got no reply, waited an entire 12 months to send the same message without the kisses, as if he’d been hurt by my prior rejection and had stewed on it all that time before deciding to give me another chance. More fool him! BACK


*** Print media is dying, ergo profits are down. Opinion pieces are cheap. Proper journalism is not. It’s a simple formula equating to tragedy. BACK

**** If you’re not an adult then get someone else to wield the scissors, and then stop reading this blog because I swear a lot. BACK *****
***** Are you sick of footnotes yet? I still like them, but I didn’t intend them to get this out of hand. ******

****** I don’t seem to be able to stop.

Beads-in-a-Net Bracelet

bead bracelet loop

I promised that I’d found a legitimate use for a knitting nancy and here it is. I know my taste is not to everyone’s but I think it’s rather nice. It’s a quick make, too.

You’ll need a tapestry needle or crochet hook, and one of these fellas:

nancy
“Who? Me?! Interrobang again?!?!”

If you’ve ever used one of these you might understand why he’s pulling that face. For those who haven’t: thread or wool goes in through his head, and a tube of knitting comes out of his backside like a really long poo. He’s actually mortified. Perhaps I’m being crass – I usually am – but why else are these are made to look like people? You can make one out of a cotton spool and four nails that works just as well and is utterly without expression, similarly without shame.

Now that I’ve made everything super creepy I might as well own it. So here’s a tutorial written in the style of Buffalo Bill*:

IMAG0210

It takes some beads and threads them onto some cotton. It threads them until the beaded thread measures 3-4 times the circumference of its wrist.

IMAG0212

It threads the end of the cotton through the hole until it comes out at the bottom. Then at the top it loops cotton around the pins like so. Clockwise or counter-clockwise doesn’t matter, it just has to pick a direction and stick with it.

nancy 2

It loops the cotton around a second time, or else it gets the hose again.

We don’t have pictures for this (do we, Precious?), but it takes a tapestry needle or crochet hook, and pulls the bottom cotton loop up and over the head of the pin before letting it go. It does this on all four pins.

It should then have a single loop on each pin, and can loop around again with the cotton to produce new top loops.

It repeats this motion – bottom loop over pin head – pulling the work through the hole as it goes by pulling on the cotton thread coming out of the nancy’s bottom.

It does this every time it’s asked, or until it’s produced a long enough chain to either tie off the bracelet or attach a clasp.

nancy 3

When it’s ready it pulls up one of its threaded beads, and traps before looping its next loop.

nancy 4

It does this before each new loop, creating pretty a web effect.

It stops this only when it has a suitable length for a bracelet, or necklace, or belt, or leash, or harness… whatever it’s making here.

Then it goes back to plain looping without beads, until it has another length for tying or attaching a clasp on the other side of the work.

nancy 5

It cuts of the cotton, leaving a tail. It threads that tail onto a needle and uses that to thread through the remaining loops, pulling them off the pins as it goes.**

bead bracelet on
Would you wear this? I would wear this.

It puts the lotion on its skin, and then it pulls the beaded chain out of the nancy’s ass.

And now I’ve thrown up in my mouth a bit. I am truly (a bit) sorry. Next time: an unholy union of cross-stitch, collage, origami, and Latin.

* If you haven’t seen Silence of the Lambs, be prepared to understand none of what passes for humour in this post. If you have seen it and you still don’t find it funny, please put it down to me having just spent 5 days being Withnail-drunk in a field. BACK

** Sorry about the nose-dive in image quality. That there night-time done went and happened. BACK

What Are You For, Exactly? Knitting Nancies and the Great Haberdashery Conspiracy

nancy
Look at him. He’s clearly having an existential crisis.

One of the many things my Nana taught me when I was tiny was how to use a Knitting Nancy. This is also known as French knitting, which is one method for knitting in the round to produce a seamless knitted tube. Excellent for arm warmers, legs warmers, and snoods – which are bafflingly popular of late. Snoods haven’t been this hot since the middle ages. Everything really does come back in eventually.

There are two other methods for knitting in the round that I know of, and they each have their pros and cons. Words are hard so I made a table to lay these out for you (click to en-big-ulate):

knitting-in-the-round-methods

The more pins your nancy has, the bigger the tube it produces. You can use roughly 50-60 pins to make one sock, so you can imagine that the four pin nancy I learned on produced a very slender tube indeed.

img_1274

Trusting child that I was, I soldiered on without asking any inconvenient questions like ‘Why am I doing this?’. It was easy, and meditative, and I could do it while I watched the telly, so I kept going. I kept my nancy for years, picking it up every so often, joining on a bit more unwanted scrap wool each time. Eventually I had a tube of knitting with the diameter of a pinky finger and a length of several metres, all in bits of wool which were ugly on their own and unimproved by association with each other.

At age fifteen I finally asked myself the inconvenient question, and when the only answer my brain offered was ‘You could be the first World Record holder for longest knitted tube?’ I completely lost heart. I have a strong preference for achievements that I’m not ashamed to tell people about.

I wish I had a picture to prove how ugly and massive the thing was, but I don’t know where it is now. My mum probably threw it out. The only sentimental thing she’s kept from my childhood is my milk teeth in her jewellery box.*

I was remembering all of this when I asked myself just what on earth the four-pin nancy was created for? They’re sold everywhere, with their cute little faces and outfits, so they must have a legitimate use? Unless haberdashers and grandparents are complicit in a conspiracy to keep children subdued with pointless labour? I simply won’t believe it.

A quick Google turned up a plethora of articles on how to make a nancy yourself, or how to get started with one, but there were no sensible comments made about the end use of a long, skinny, woollen tube.

“It’s easy! Try it!”, said the internet. Well, so is growing mould in a mug, but I personally wouldn’t know what to do with the end product.

Then I looked a bit harder and found some truly hideous tat produced using these tubes. When I say hideous I don’t mean like an unwanted handmade Christmas present. I mean like an unwanted handmade Christmas present from your cell-mate. Real prison-chic. I’d post some of it here but you don’t need these nightmares.

I will admit that all of this is a little disingenuous, because I did once find a legitimate use for a nancy and that’s why I currently own one. I made stems for the flowers in a knitted hanging basket. Still, are we to believe that every haberdashery in the world stocks adorable little nancy-boys-and-girls for exactly this purpose?

IMAG0202
Is this what the inventor intended?

What is going on here? After some serious thought I did come up with something else I could use my nancy for:

IMAG0225

It turned out pretty well so I’ll post a tutorial next time. In the meantime feel free to tell me how very wrong I am in the comments. Also, let me know if you want a knitted flower tutorial and I’ll try to remember how I did that.


* Creepy? Yes creepy. I suspect she hasn’t ruled out using them to gain complete power over me through voodoo. Not because she’s controlling as mothers go, but who doesn’t want a zombie butler? I wouldn’t even resent her choice.** BACK

** The fact that zombie-me would be incapable of resentment in no way diminishes the validity of my point.

Butterfly Cross Stitch Pattern

I moved in to my flat nearly 3 years ago. I won’t expose the murky contents of my soul, but it was a very bad time and I had been staying with my mum for a week or two. I wasn’t even sure if I liked this place. I just needed to move ASAP and my landlady said it was mine if I could get her the deposit that day. So out of desperation rather than enthusiasm I did so, and totally sniped this place out from under the nose of someone who had probably fallen in love with it. I hope they went on to win the lottery and live in a palace made of gold. I hope they’re no longer bitter.

Back to me – my first impression was not helped by my landlady’s choice of art.

artThe art was so bad I barely noticed the couch.

In the living room she had not one, but two canvasses featuring pebbles. These images mostly make me think: Why pebbles? Why not porridge oats? Or sand? Really commit to your blandness, if bland you must be.

In my landlady’s defence, she may have felt that bland was the way to go after the frankly terrifying Beatles tribute hanging in the bathroom. Above the toilet of all places. As much fun as I had showing my bare arse to these hideously mangled local legends a couple of times a day, I was half convinced that they’d climb out of the picture and eat my ovaries if I missed my rent. Especially alternate-universe-train-wreck-survivor-George Harrison.

It all had to go.

For a while I had nothing on my walls, and as much as this was an improvement eventually I decided the place needed more character.

It was about this time that I started playing with an extension for Java called Processing. It lets you create images and animations using a few simple lines of code. You can do some really fun things with it straight away (I highly recommend the tutorials on their website), and some very clever people have done some amazing things with it including music videos. I’m not that clever though, so I just used it to write a program that generates cross-stitch patterns from images.

Yes, using the incredible power of Processing in conjunction with the humble tapestry needle I managed to turn this:

butterflies

Into this:

IMAG0256

Yeah, it doesn’t look so great next to the original, but it beats the shit out of pebbles and didn’t turn out to badly for my first ever cross-stitch.

If you fancy trying your hand at cross-stitch, and are an absolute, clueless beginner-numpty like I was, here’s a list of things I would’ve found useful when starting out:

  • Aida Fabric is the name for the most common type of fabric used in cross-stitch. It has a wide set weave to give you an obvious grid pattern to follow
  • 22 count, 18 count, 14 count, etc. – the counts on an Aida fabric indicate how many stitches a stitch stitcher can stitch when a stitch stitcher stitches an inch. In short, 18 count Aida will give you 18 stitches per inch
  • Tapestry needles are what you will stitch your stitches with. They’re like regular sewing needles but much chunkier so you can thread embroidery cotton through the eye
  • Speaking of embroidery cotton, I use the six-stranded cottons. I cut a length and then separate the strands into two sets of three, so I end up with two lengths of half the thickness. This works just as well and the cotton goes further that way. The threads come in skeins, are pretty cheap, and available in all colours of the rainbow from a normal haberdasher
  • Stitch a full line of forward slashes, and then fill in the back slashes. Don’t do each individual cross one at a time. It saves cotton and time

IMAG0253IMAG0252

If none of that made sense, try this video which says everything I just said in the inhuman, incredibly monotonous tone usually reserved for flight safety information videos (please-attend-to-your-own-oxygen-mask-before-helping-others, and so on). It also says a lot of other useful things I didn’t think to.

If you want something to practice on, my butterfly pattern is below. Right click and save and it’s all yours. You lucky thing.

butterflies_pattern

The Patchwork “Quilt”: Lessons Learned

Finished Quilt

The patchwork “quilt” came about as part of my quest to make my surroundings ever more twee, because twee-ness juxtaposes so nicely with my utter disdain for most people and things.

The quotation marks of the title are obnoxious, and for that I apologise. I’m quoting myself whenever I tell people I made a quilt, which I didn’t. I made a duvet cover. But the word ‘patchwork’ flows into the word ‘quilt’ in a way so long-established in my psyche that I no longer have any control over my diction after the second syllable. Instinct and laziness take over.

I have a tendency to let my enthusiasm for a project carry me into doing things in a completely half-arse-backwards way. I’ve been known to injure phalanges, sometimes even whole limbs, with strain and effort that could have been avoided if I’d only planned a bit. My beloved duvet cover is a fine example of this. Learn from my fatal flaw and your hands may yet remain un-cramped and un-calloused.

Here are some lessons I learned, in no sensible order:

1. Draw out your pattern first, and get a count of patches in each colour
Witness the extent of my forward-planning:

patchwork plan

Beee-ooo-ti-ful, is it not? This is one thing I don’t regret. It took me ten minutes, scribbling on stolen work post-its. It was my gospel throughout the many long hours of cutting, sewing, unpicking, and general fuck-ups. For example: I spent an evening of furious arithmetic* staring at this, figuring out how many more triangular patches I needed after discarding a load that just would not sew up properly.

All this because I didn’t know about the second lesson…

2. Don’t cut the patches by hand
You may save money by swerving the purchase of proper quilting tools, but you will get a huge crick in your neck from hour upon hour of cutting out shapes in front of the TV (to stave off the boredom). You will also get finger callouses which will serve as a semi-permanent reminder of your hubris. You might even become so miserable that you give up the whole endeavour and instead go and sit in an empty bath tub for hours. Alone. In the dark. Either way you’ll get wonky patches, which is more than a little annoying once you get to the sewing stage.

This brings me to my next lesson…

3. Don’t sew by hand
Ignore this rule if your bucket list reads:

  1. Complete exactly one patchwork quilt in my entire life
  2. Curl up in said quilt and die a martyr to the Luddite cause

4. Quilts are not better than duvet covers
Quilting is the more traditional way to mount a piece of patchwork, and that’s nice. Mounting your work on a duvet cover is cheaper, makes it easier to wash, and makes it easier to re-mount.** You can also change the thickness of the duvet inside to make it a cover for all seasons.

5. Recycling old clothes for patches is not as easy as it sounds
During my patch-cutting stage I recycled two pairs of old trousers, a dress, and a skirt before I realised that unpicking complicated seams is a mug’s game. Unless recycling is a very important part of your project’s aims you’re better off buying cheap fabric in nice, big rectangles. These have never been a thing, so they won’t resist being the thing you now want them to be.

Partial PatchworkA quick game of ‘spot the seat of my old work trousers’

6. Don’t use stretchy fabric
You’ll think it’ll be OK and in the end it might be, but it’ll also be a massive ball-ache along the way. Stretchy fabric cares not for your careful measurements. You will almost certainly end up with wrinkly seams trying to compensate for its fickle ways.

7. Make sure your pattern does not look like a swastika, or genitalia, or your ex’s face
Unless that’s what you want, in which case ignore me. The best way to check whether your pattern has symbolic meanings that you didn’t intend is by showing it to a younger sibling. Love you or not, they are almost certainly looking for ways to make you feel like an utter tool whenever possible. This may be the first time I’ve found a use for this quirk.

My original pattern had an unintended Nazi flavour which is missing from the finished work. It’s missing because I have a younger brother who loves to point out my mistakes. If you are not similarly blessed, try a bus driver. They have a near identical mind-set, minus the love.***

8. Listen to good music
I sang while I sewed. The hours flew by and it didn’t feel like work. And I sounded lovely, thank you. Just. Lovely.

9. Have faith
From the very first section that you sew up to the last you will be uncertain whether your fabrics clash in a tasteful way, or if your interplay of light and dark colours is right, or if the pattern you planned is emerging, etc., etc., ad nauseam. Just keep going. Perseverance builds character. The ability to finish things is a skill in its own right. And it will most likely look awesome anyway.


* I don’t wish to brag, but there may have been some Pythagoras. BACK

** Mount, mount. Mount-mount. MOUNT. There. Out of my system. BACK

*** Bus drivers can’t love. BACK

Jar-full-o-Yarn Centrepiece

2013-03-30 10.35.47

My mum, who must be obeyed, put me in charge of decorations for my nana’s 80th birthday party earlier this year. My nana played a large part in my upbringing and it’s to her I owe my interest in crafting. She taught me to knit, sew, and crochet at such a young age that I find it hard to believe that my pudgy little fingers had the dexterity to thread a needle. But they did, and I am grateful to them and to her.

My interest somewhat abated during my teenage years as I was busy being an entitled little shit in the time-honoured fashion.* But I found my way back in my mid-twenties once I realised that being happy and fulfilled, for me, involved making things as well as consuming things.

That being the background of my relationship with the birthday girl, I felt that just laying out balloons and plastic banners wouldn’t be quite right.

I thought up these centrepieces while lying in bed on a week night when I should really have been sleeping. Originally they were much fancier affairs with a central tube of water to hold long-stemmed flowers, surrounded by tiny yarn balls and pearly beads, all within a statuesque glass vase. I quickly realised that this was (a) really specific and hard to find the materials for, and (b) expensive. I had one month and a strict budget. So jam jars and plastic champagne flutes became my shabby-chic saviours.**

After agonizing over which jar of pickled produce was the right size for long enough that people had started to stare, I selected eight large jars of beetroot, got stared at with greater intensity, and then picked up some plastic champagne flutes to form the central water tube/flower holder. I checked the height of these against the jar to make sure they wouldn’t peek over the edge. After the fact I was very glad I chose the ones with the detachable base. Only the stem is useful here. This sits inside the jar, supported by all the balls.

IMAG0053

Then came the labour-intensive part: my balls.*** Originally they were all yarn but this took a long time per ball, and yarn isn’t as cheap as anyone would like. Then I tried using scrunched up bits of paper as the centre of the ball, but it was a lot of faff to scrunch paper just right so that the resulting ball would actually be spherical. Then I moved on to cotton balls and never looked back. They come pre-scrunched and you can get about 100 for pennies.

step 1Beautiful in its simplicity: the humble cotton ball

step 2Start to wrap the yarn around the ball

step 3Once you feel the ball is big enough, cut off the
yarn leaving a tail a couple of inches long

step 4Use a tapestry needle to thread the tail through
the top layers of yarn. This should secure your tail
sufficiently to prevent unraveling

stap 5Cut the last visible bit of the tail off, and you’re done

Repeat as many times as you need. I found I needed about 18 balls per jar.

The pearly beads that pretty-up the gaps between my balls came in two long strings of two different sizes – smallish and smaller. You can get them cheap in lots of places and just take the scissors to them. At first I tried artfully scattering the beads as I layered up my balls within the jar. But then I learned to my surprise that small round things don’t stay where you put them. Ever. So instead I super-glued one or two beads to each ball and left them to dry over-night.

IMAG0062

When filling the jar I found it best to stack the balls in layered circles around the walls, rather than attempt to fill the whole jar.

Once my balls were in I measured the circumference of jar’s opening and cut a piece of ribbon about three times as long as it was round. I glued this ribbon around the opening, and let it dry overnight. Once dry I tied a bow and cut off any excess length.

IMAG0057

And just like that I had knitting-themed centrepieces for my crafty nana. She liked them so much she asked to keep one, which is the equivalent of actual praise in my family.

Finished table setting

* Drinking my pocket money, racking up massive phone-bills, telling everyone how little they understood me and then refusing to explain myself. BACK

** TOP TIP: it’s a lot cheaper to buy jars with something in them than it is to buy new, empty ones. Why? Because capitalism. As I type this I’m remembering that I have a large quantity of pickled beetroot in my fridge that needs to be disposed of. Although that sounds suspiciously like future-me’s problem. BACK

*** At this point I should warn you that I will be unabashedly throwing the word ‘balls’ around wherever possible throughout this post, just to amuse myself. BACK